




Support inbox
Contents
The PostHog web app is home base for a support engineer. It's the surface for your Support inbox, where you read and reply to customer tickets, and it gives you the full context of what each person was doing when they reached out.
Find and open tickets
Open your inbox from Support in PostHog. From there you can:
- Filter by status, priority, channel, SLA state, tags, or assignee
- Search by ticket number, customer name, email, or message content
- Save a filter combination as a view, to switch between common queries
A ticket's status tells you where it is in your workflow:
| Status | Meaning |
|---|---|
new | Just created, not yet viewed by your team |
open | Being actively worked on |
pending | Waiting for a customer response |
on_hold | Paused for an external reason |
resolved | Issue resolved, conversation closed |
What's in a ticket
Each ticket carries a set of properties you can filter, sort, and act on.
| Property | Description |
|---|---|
| Ticket number | Auto-incremented unique number, for example #1, #2, #3 |
| Status | new, open, pending, on_hold, or resolved |
| Priority | low, medium, or high. Unset by default |
| Channel | Where the ticket came from: widget, email, slack, teams, or github |
| Assignee | The user or role responsible for the ticket |
| Session ID | The PostHog session used to load events and exceptions |
| Distinct ID | The distinct_id used to link the ticket to a person |
Reply with full context
Open a ticket and the customer's story sits next to the conversation, so you resolve issues without asking anyone to reproduce them.
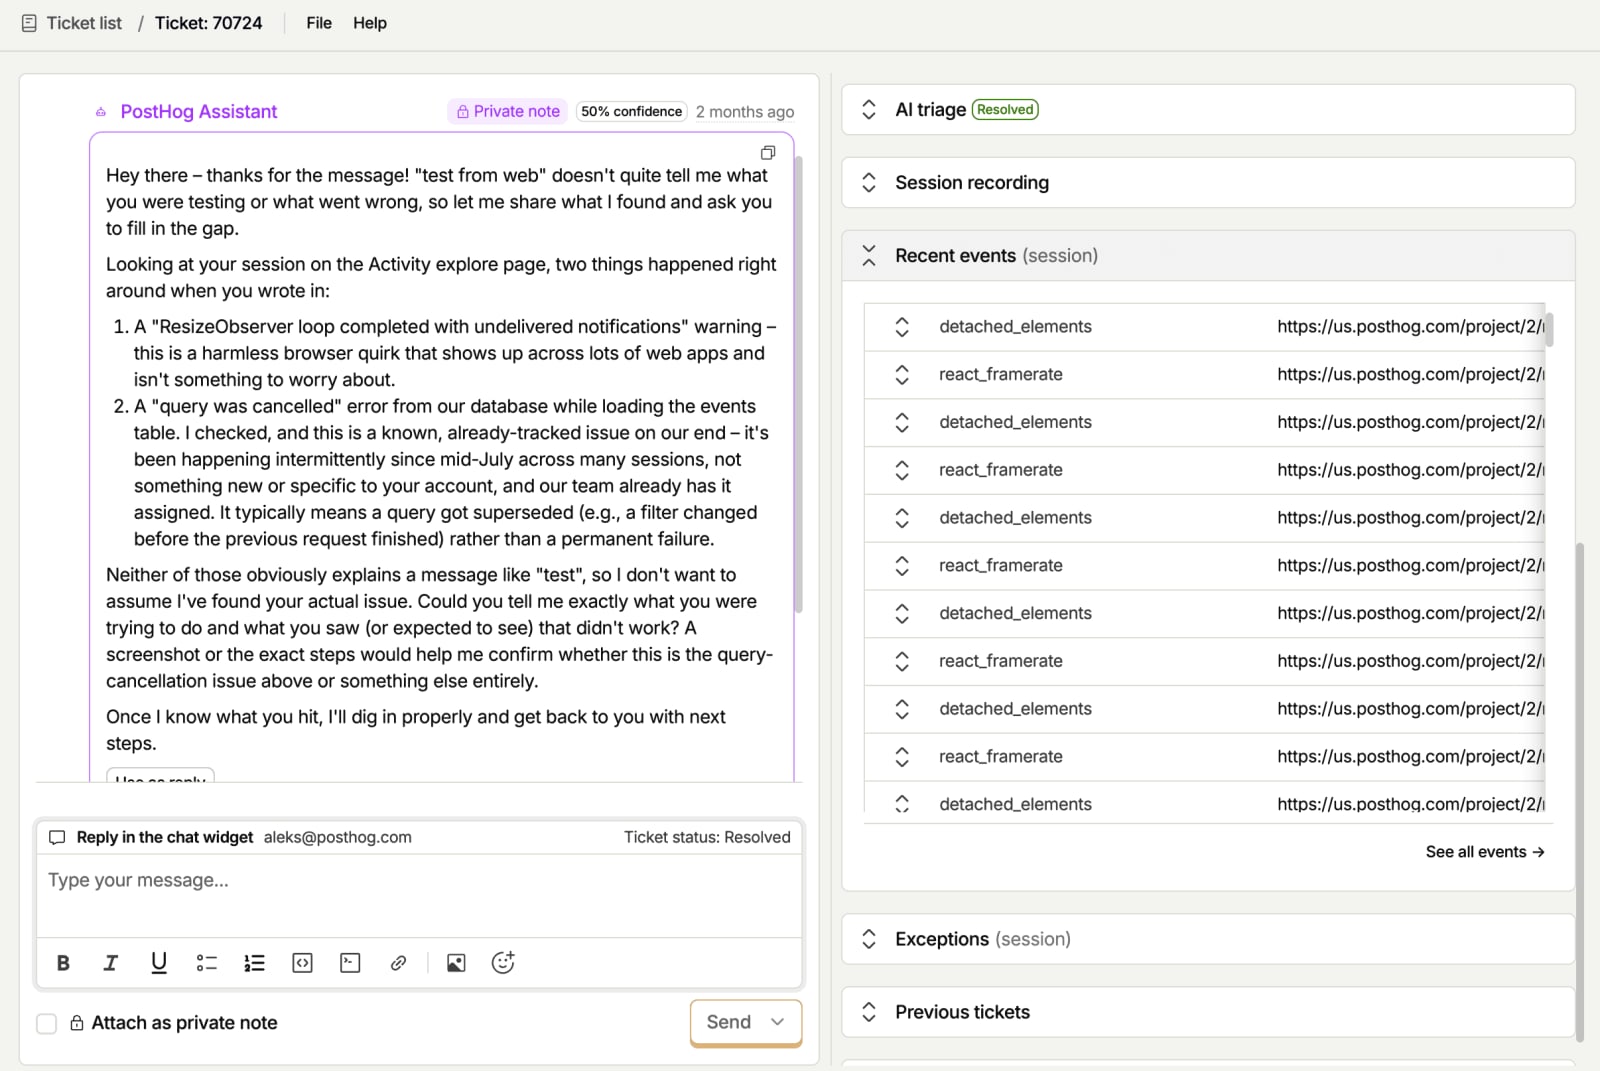
Each ticket detail page can show:
- Chat thread - The conversation with the customer. Replies you send reach them on the channel they used.
- Session recording - Watch the customer's session replay for widget tickets, if replay is enabled.
- Recent events - The events from when the ticket was created, for widget tickets.
- Exceptions - Any errors from their session, for widget tickets.
- Previous tickets - Past conversations with the same person.
- Activity log - A history of status, assignment, and priority changes on the ticket.
Messages
Every message on a ticket has an author type.
| Author type | Description |
|---|---|
| Customer | Sent by the end user through the widget, email, Slack, or GitHub |
| Support | Sent by your team from PostHog |
Replies you send show a delivery status so you know they landed. Widget messages show Sent when delivered and Read when the customer views them. Email replies show Sending, then Sent on success or Failed if delivery fails.
You can mark any message as a private note. Private notes are visible only to your team, hidden from the customer, and don't count toward the customer's unread messages. Use them for internal context or handoffs. Support tracks unread messages separately for the customer and your team, and counts reset when your team views a ticket or the customer marks messages as read.
Reply and update status
Use the Send button's dropdown to reply and update the ticket status in one step. Click the arrow next to Send to choose Send and set pending, Send and set on hold, or Send and set resolved.
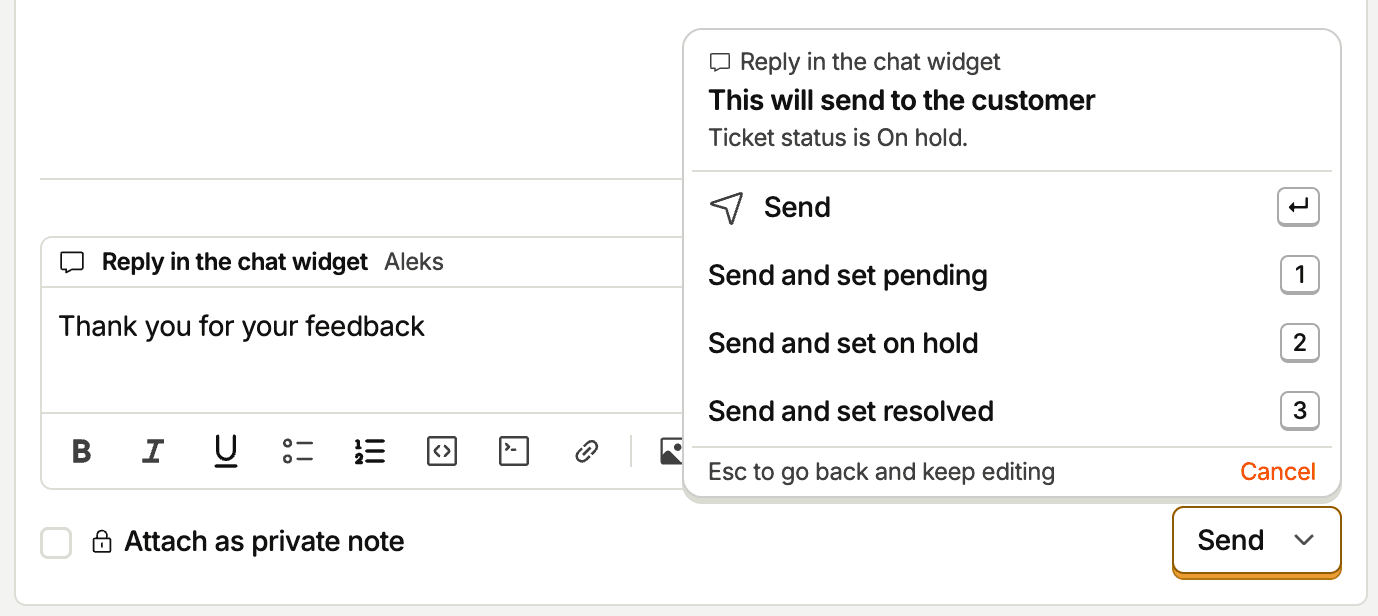
When you use one of these options:
- Your reply is sent first, then the ticket status is updated.
- If the ticket is unassigned or assigned to a role, it's reassigned to you automatically.
- If there are unsaved changes to priority, assignee, tags, or snooze, a confirmation dialog lists exactly what else will be saved along with your reply.
The confirmation dialog gives you two choices: Send and save commits all changes, while Cancel aborts everything – nothing is sent and nothing is saved.
Reply macros
Save replies you send often and insert them into the ticket composer. You can share a macro with your team or keep it to yourself.
Create a macro
- Go to Support > Settings > Macros (or open the Macros menu on a ticket and click Manage macros).
- Click New macro.
- Give the macro a name, an optional
/shortcut(lowercase letters, numbers, and hyphens), who can see it, and the reply body. - Click Save.
Leave the shortcut blank to keep the macro in the Macros menu only.
Under Visible to, choose who can see and use the macro:
- Everyone (
shared, default) shares the macro with everyone in the project. Creating, editing, or deleting a shared macro is recorded in the activity log. - Only me (
personal) keeps the macro private to you. Teammates cannot see it in the app, by ID, or over MCP, and changes stay out of the team activity log. It shows Only you in the picker, the slash menu, and the settings table. Only the person who created a macro can set it to Only me.
Shortcuts are unique within their scope: shared shortcuts are unique across the project's shared macros, and personal shortcuts are unique to you. A personal shortcut never blocks a teammate from using the same shortcut.
Variables
Macro bodies use markdown and can include variables in double braces. You can type them or click the variable buttons below the editor:
| Variable | Fills in with |
|---|---|
{{customer.first_name}} | First word of the customer's name |
{{customer.name}} | Customer's name, or their email address when no name is set |
{{customer.email}} | Customer's email address |
{{agent.first_name}} | Your first name |
{{agent.name}} | Your full name, or your email address when no name is set |
{{ticket.number}} | Ticket number |
Variables fill in when you insert the macro. If a variable has no value on the ticket (for example, {{customer.first_name}} when the ticket only has an email address), the {{...}} token stays in the text so you can see the gap before sending.
Insert a macro
On a ticket, insert a macro in either of two ways:
- Click Macros at the bottom of the composer and pick a macro.
- Type
/at the start of the draft or after a space, then type the shortcut or search text and press Enter.
If the composer is empty, the macro replaces the draft. If you have already typed text, the macro is inserted at the cursor. Inserting a macro keeps the draft's current visibility (public reply or private note).
The Macros menu lists your most-used macros first. When you type a query or /shortcut, an exact shortcut match ranks first, and your personal macro ranks above a shared macro with the same shortcut.
Assign, tag, and snooze
Assign a ticket to a user or a role from the Assignee dropdown in the sidebar. You can also auto-assign with Workflows. Each ticket has one assignee. Add free-form tags to categorize and filter tickets, and snooze a ticket until a set time when you're waiting on something external.
Delete a ticket
Delete a ticket when it holds information that shouldn't stay in PostHog, such as sensitive details a customer shared by mistake. Open the ticket, click Delete ticket at the bottom of the sidebar, and confirm.
- The ticket and its messages disappear for your team and the customer right away.
- PostHog permanently deletes the ticket 14 days later, along with its messages, attachments, and analytics events.
- Messages already sent to Slack, Teams, email, or GitHub stay in those tools.
You can't delete a single message. To remove a message, delete the whole ticket.
If your organization uses access control, only ticket managers and organization admins can delete tickets. Otherwise, anyone who can edit tickets can delete them.
Track SLAs
An SLA deadline is derived state, not a status. You set it through workflow automation, and the ticket then reports as on track, at risk, or breached. You can filter and sort the inbox by SLA state.
Automate ticket handling
For the repetitive parts, let rules do the work. Workflows run on ticket events to set SLAs, auto-assign, tag, route, and change status automatically. For example, set a 4-hour SLA on widget tickets, auto-assign by customer domain, or reopen a ticket when the customer replies. It's rules you control, with no autonomous AI. See Automate ticket handling for the full set of triggers and actions.
Tips for efficient support
- Check session replay before asking a customer to describe what happened.
- Look at the exceptions panel to identify bugs quickly.
- Review previous tickets to avoid asking repeat questions.
- Use Send and set pending to reply and mark the ticket as waiting for a customer response in one step.
- Save common answers as reply macros with
/shortcutsand variables like{{customer.first_name}}. - Use saved views to switch between common filter combinations.
- Snooze tickets when you're waiting on something external, instead of leaving them open.